Body temperature
measurement
Normal body temperature is a “range“, not a
single point, as temperature varies from
person to person. A person’s temperature can
rise with excessive clothing, hot weather or
accelerated activity (such as crying or
exercise). In order to observe these naturally
occurring variations and determine the normal
temperature range for each member of your
family, practice taking temperatures on
yourself and healthy family members at
different times of the day to determine their
“baseline“ temperature. The normal range for
ear temperatures taken with the Braun
ThermoScan Instant Thermometer is from
35.8°C (96.4°F) to 38.0°C (100.4°F) for all
ages.
Normal body temperature also varies with
age. We have the highest temperatures when
we are younger. About our eleventh year,
body temperature begins to decrease
gradually. The elderly population has the
lowest body temperatures. For your reference,
the following chart shows normal ear
temperature ranges by ages groups for the
Braun ThermoScan Instant Thermometer:
When consulting your physician about fever,
remember to communicate that this is an ear
temperature, referrring to the appropriate ear
temperature range in the chart above. Also,
note the individual’s “baseline“ temperature as
an additional reference point.
Normal Ear Temperature Range by Age
Years of Age Celsius Fahrenheit
0 - 2 36.4°C - 38.0°C 97.5°F - 100.4°F
3 -10 36.1°C - 37.8°C 97.0°F - 100.0°F
11 - 65 35.9°C - 37.6°C 96.6°F - 99.7°F
>65 35.8°C - 37.5°C 96.4°F - 99.5°F
How to use the
Braun ThermoScan
Instant Thermometer
1. Remove the thermometer from its stora
ge
cover. If stored properly, a new lens filter will
already be in place. (See procedure on
page 7.)
Do not use thermometer without
lens filter attached.
2. De
press the on-button that is located
directly below the LCD (liquid crystal
display) to turn the power on. (See Figure 1)
• All segments on the LCD-display (Figure
6) will be shown for two seconds to
indicate a fully functional display.
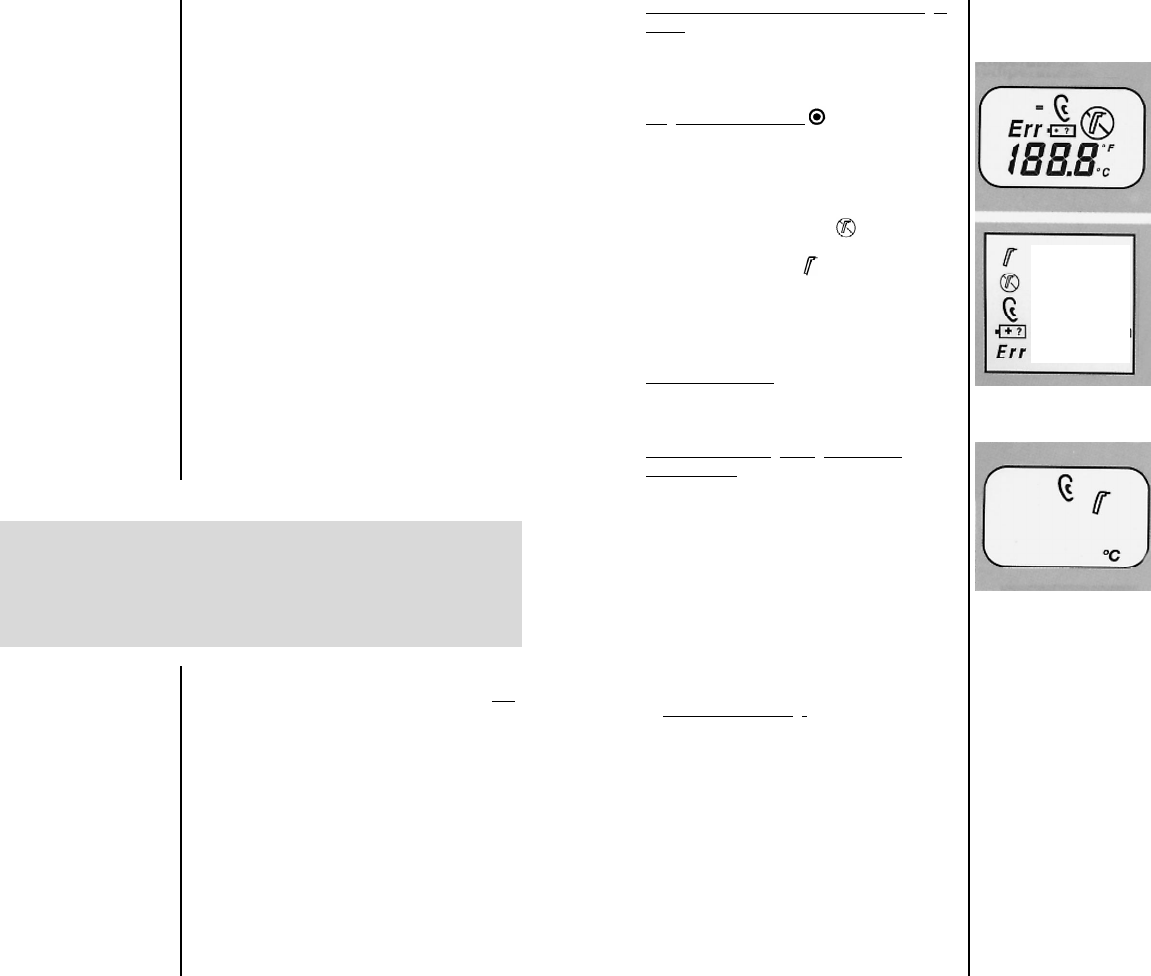
• The display will indicate (not ready)
while the unit is completing self test, then,
within two seconds (ready) indicating
that the thermometer is ready to take a
temperature (Figure 7). If no temperature
is taken within two minutes, the ther-
mometer will automatically shut off.
3. Stabilise the head
. In infants, this is best
achieved by laying them flat with the head
rotated so the ear is up.
4. Perform an ear tu
g and position the
thermometer. In order to take an accurate
temperature, the thermometer must be
positioned correctly in the ear. In addition,
an “ear canal straightening“ technique must
be used to straighten the natural bend of the
canal and ensure that the thermometer has
a clear view of the eardrum.
• If you are right handed, hold the
thermometer in the right hand and take
the temperature in the right ear. If you are
left handed, hold it in the left hand and
use the left ear. This will help ensure
proper placement.
• Perform an “ear tu
g“ by using your free
hand to grasp the outer edge of the top
half of the ear and follow the steps in the
chart below. To take your own temper-
ature, an ear tug is best achieved by
wrapping your free hand around the back
of your head and grasping your ear from
behind.
Continue pulling the ear until you are
finished taking the temperature.
10 11
Ready
Not ready
Ear
Change battery
Error
Figure 7
Figure 6


 (19 Seiten)

 (54 Seiten)
 Manymanuals.com
 Manymanuals.de
 Manymanuals.fr
 Manymanuals.it
 Manymanuals.pl
 Manymanuals.cz
 Manymanuals.es
 Manymanuals-pt.com
Kommentare zu diesen Handbüchern